


Shibori Davie Dress
This is the latest release by Sewaholic Patterns, the Davie Dress!
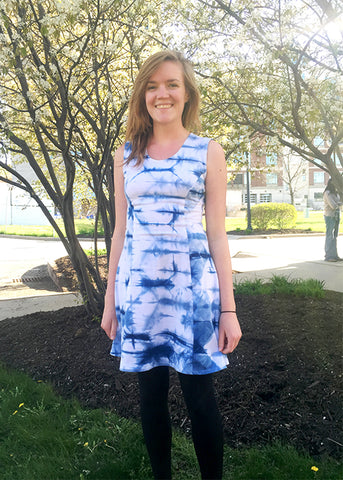
You might notice I’m not in front of my usual backdrop of fabric. That’s because, last night, I got to ride a train! My boyfriend and I were very kindly provided with tickets for a beer tasting on the Cuyahoga Valley National Park train by his dad. It was so much fun. These pictures were taken by some lovely trees next to the Porta Potties at the station. The woman in the background is next in line! I would have loved to get photos next to the engine, but it was on the other side of a bridge.
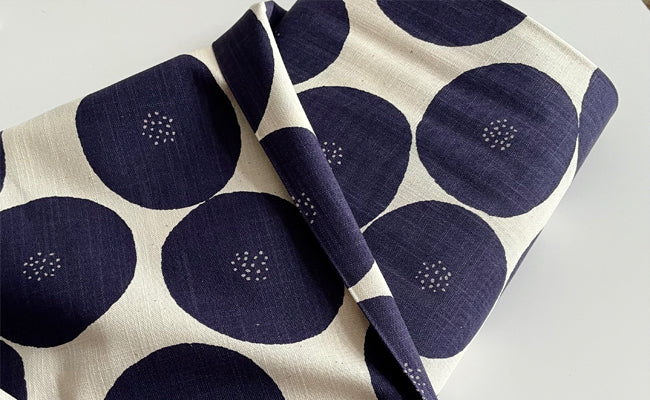
I’m so pleased with the dye-job of this dress. After several unsuccessful attempts at making a natural indigo vat, I ended up just buying an indigo kit from Dharma Trading Company. Indigo is really fun to dye with–it’s a neon green at first, and contact with oxygen turns it blue. I dyed everything I could get my hands on. For this fabric, I cut the width in half, accordion-folded it, and then folded it into triangles, like a flag. And I wasn’t super precise, so obviously there would be no hope of matching up stripes. I did two rounds of this.

I cut the front and back pieces on the fold to show off the print, so I had to eliminate the keyhole. Next time I’ll keep it, I think it’s cool. Without it, I thought the neckline was a little oppressive, so I lowered it. And I had to bring in the underarms by, like, two inches.

I used this white modal knit, which is so amazing. It’s a four-way stretch knit with excellent recovery, and for a t-shirt-weight white fabric, it’s pretty opaque! And totally dye-able. Sewing with it was super easy and pleasant.

Not that I’m an expert at sewing with knits, but I was surprised that the directions recommended using a straight stitch to construct the dress. I was under the impression that straight stitches in a knit would explode the second you put any stress on them. But, I did them anyway, and my dress did not fall apart. The dress is body-skimming, but not tight, and there’s enough stretch in the fabric to get it on. I imagine the straight stitches help support the weight of the dress, as it would probably sag with a zig zag stitch.
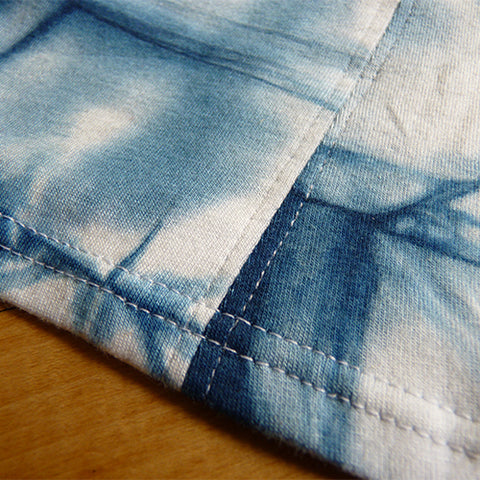
I used a ballpoint needle and a 3mm straight stitch to sew all the seams and to topstitch them. And I hemmed it with a twin ballpoint needle. To attach the bias tape, I used a regular needle, which I kind of regret, because I don’t think it played nicely with the fabric. Universal needles are supposed to be okay with knits, but I should have tested it first. Ask me about sewing needles, I can regurgitate almost everything I read from the Schmetz website.

The instructions have you bind the neckline with bias tape, and turn and stitch it down (tutorial here). But there was no way I was going to neatly get something a quarter inch wide and a quarter inch thick through my machine, so I used the bias tape as a facing, instead, and did the same thing with the armholes.

If you’re interested in shibori, I think in June we’ll be doing a small workshop with these Yellow Owl indigo kits, so you can create a kind of faux-shibori. They’re nice because you can get the look without the mess and smell of an indigo vat, and you won’t dye your bathtub blue trying to rinse out your fabric.
Leave a comment
This site is protected by hCaptcha and the hCaptcha Privacy Policy and Terms of Service apply.