


FOX8 Skirt Tutorial
How fun!
FOX8 TV came to Bolt & Spool this week to shoot a segment for their New Day Cleveland morning show! It’s part of a larger feature on University Circle that will air on Monday, March 4 on Cleveland’s own…FOX8! So be sure to tune in and check out the fun things to explore in the neighborhood after you’re done shopping at Bolt & Spool!
Luckily we knew they were coming and we had ample time to get ready! And by that I mean we had time to make something to wear! (So why am I caught here on camera pressing my hem just before they arrive???)

Debbie designed a totally adorable skirt – that will most likely only look good on someone well under the age of 30 – so she’ll have to blog on her own about that separately.
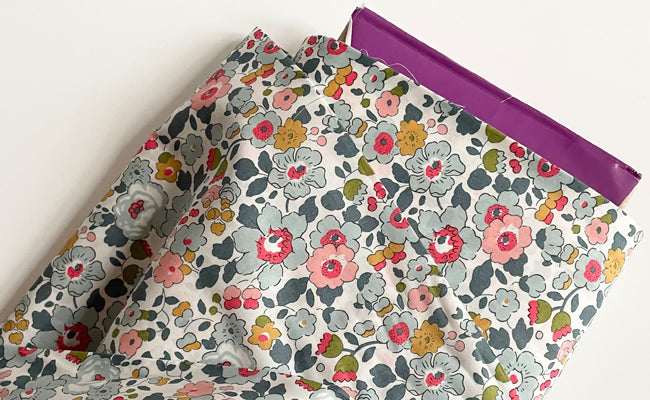
As for me, I wanted to make something that didn’t look too springy or too wintery, so I compromised. I used a lightweight super 100 gray wool flannel and incorporated some awesome ribbon from Amy Butler’s new spring collection. It’s fresh without looking like I’m starving for a pair of bermudas (which, of course, we are – here on the north coast).

What’s especially fun about this ribbon is that there are so many fabulous colors that can play off of it. So…off to the mall with my strip of ribbon to find something to wear on top! After a quick stop in Saks – they had two possibilities – I headed to J Crew. I found several things that would work perfectly and settled on their “Stretch Perfect Shirt” in frosted lilac gingham. Happy with my find, I went home to start sewing!
How to Construct the Skirt…
The skirt is basically a rectangle skirt with a few added blings.
Materials:
- 3/4 yard of at least 54″ wide fabric (if you are super-tall you may need a couple of inches more)
- 1 yard of ribbon (preferably 2″ wide)
- one invisible zipper (length doesn’t matter because you can always cut it off wherever)
- one yard medium-weight, iron-on interfacing
- coordinating thread
Tip: Choose a fabric with some drape, since the gathers will be hitting you at your hips, you’ll want them to lay as flat as possible or you’ll look like a bubble! So quilting cotton would not be my first choice – pick something thinner like a lawn, lightweight shirting or a voile for summer or a super 100 wool like I chose for winter. If you are using cotton, be sure to wash and iron your fabric before you begin cutting!
1) Open your fabric out and cut a strip off the top that’s 5 1/2″ wide. Make sure you are cutting on the crosswise grain or your skirt will hang wonky! (Remember, the fabric may not but cut straight when you leave the fabric store – not Bolt & Spool, of course! – so always check to see if you need to true up the top edge before you start cutting!) This will be your waistband. Once it’s cut, you can cut the length to comfortably fit your waist plus 1″. Cut your interfacing the same dimensions and iron it to the wrong side of your waistband.

2) At this point I added a little wooden buckle slide to my ribbon. It’s non-functional, but I thought it was fun. Now cut your ribbon the same length as your waistband.
3) Fold waistband in half lengthwise – press and open out to create a fold line. I marked a chalk line 1/2″ from the edge to show the seam line where I will sew it to the skirt. Center your ribbon between this chalk line and the pressed fold line. If you are using the little buckle doo-dad, position it where you want it now! I put my a little off to the left side in the front. Now pin your ribbon to the waistband and the stitch in place.

4) For the body of the skirt, you may first need to cut the selvedges off if they are wide or have printing on them. Sew two rows of wide basting stitches along the crossgrain (from selvedge to selvedge) one at 1/4″ and another at 5/8″ from the top edge. Gather skirt by grasping and gently pulling the bobbin thread (the bottom thread) of both rows.

5) Space gathers evenly and pin skirt to the waistband. Make sure right sides are together and the ribbon edge of your waistband is up before you stitch! Use a 1/2″ seam allowance to stitch – yes, this falls right between your two basting lines! After you sew the waistband to the skirt, remove the lower visible basting stitches.

6) The zipper! I highly recommend using an invisible zipper. Here is a link to one of our suppliers (Colette patterns) who does a fabulous job of explaining how to install an invisible zipper. There are other video tutorials out there on the web as well, but I think this one is the best. One important note…position the top of the zipper so the teeth start just below the pressed fold line of your waistband! Also, I used a 1/2″ seam allowance instead of the customary commercial 5/8″. Once you have installed the zipper, finish sewing the remainder of the back seam below the zipper using a 1/2″ seam allowance.
7) Finish the waistband. Fold the raw edges of the waistband under 1/2″ and press. Fold waistband to the inside and slip stitch it into place along the seam line.

8) Hem your skirt. I used a 2 1/2″ hem allowance because I like how the weight of it makes the skirt hang nicely! You’re done!

My FOX8 Skirt and J Crew blouse together!!
Thank you Rachel Stephens – producer of FOX8’s morning show New Day Cleveland – and camera man Herb for helping make us feel relaxed during our taping! I was nervous for my first time on TV and they were absolutely great!
~Happy sewing! Nan
Leave a comment
This site is protected by hCaptcha and the hCaptcha Privacy Policy and Terms of Service apply.